


Microscopic Particulate Analysis (MPA) Sampling Instructions
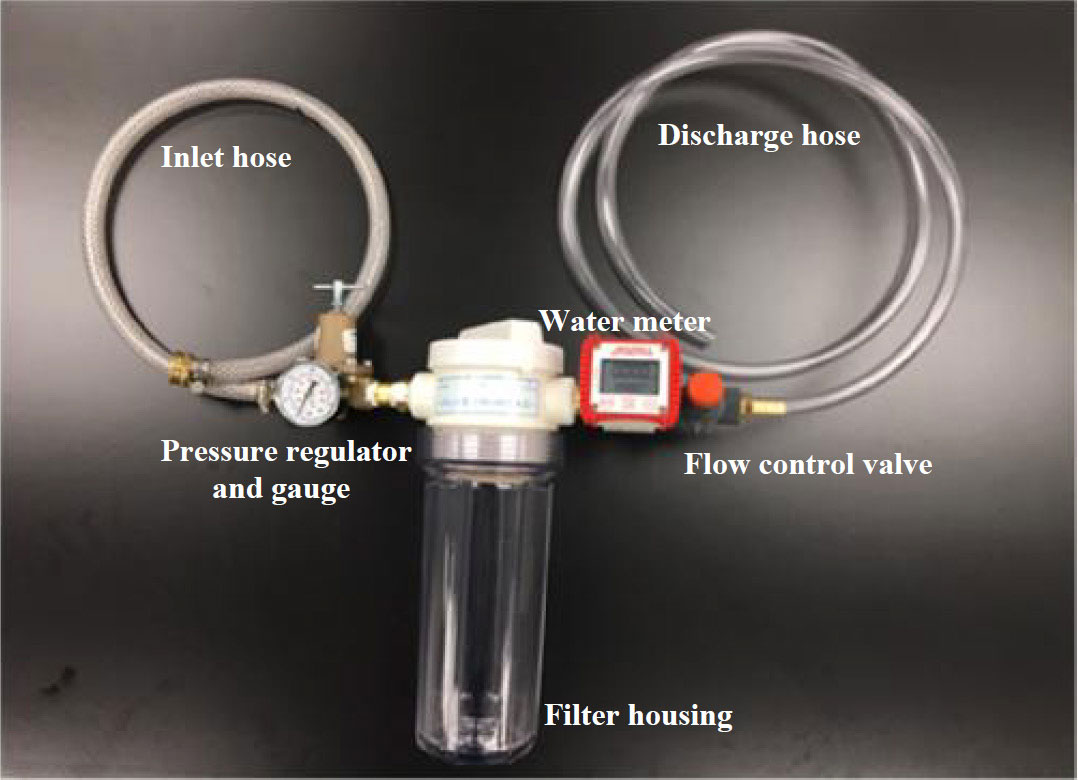
Sampling kit provided by EMSL includes:
- Inlet hose
- Pressure regulator and gauge
- LT-10 filter housing
- Cartridge filter (s) (M39R10A)
- Water meter (flow rate meter and totalizer)
- Flow control valve
- Discharge hose
- Pump (optional, for non-pressurized water sources)
- Proportionating injector (optional, for chlorinated water only)
- Clamps for unit assembly
- Whirl pak plastic bags or zip loc heavy duty quality freezer bags
- Chain of Custody (COC)
Sampling Parameters
Consensus method (Groundwater Under the Direct Influence of Surface Water (GWDI) ) Avoid sample sites within the distributed system. Sample(s) should be collected prior to any blending, disinfection or other treatment. Minimum 500 gallons, recommend 1,000 gallons over an 8–24 hour period per EPA requirement.
Filtration Plant
- Raw surface water
- Sampling prior to chemical addition and after any presedimentation basins (if no chemicals were added prior to presedimentation). If recycling operations are practiced, the raw water should be sampled after the recycling input.
- A minimum volume of 100 liters (27 gallons) for a 12 to 24 hour period. The ideal volume is the amount equivalent to a complete day of production. If the filter becomes clogged or plugged due to highly turbid waters, terminate sampling and record the volume collected to this point.
- Finished water
- Sampling after the filtration system and prior to chlorine addition, if possible.
- Minimum 1000 liters (264 gallons). Collection period should encompass a full cycle run, or for 24 hours, including at least one backwash cycle. Backwash cycles can occur at the initiation of the sampling period.
- Chlorinated Samples: If chlorinated water must be sampled, an injector system will need to be installed to add a sodium thiosulfate solution to denature the chlorine. Add sodium thiosulfate solution via the injector system to produce a final concentration of 50 mg/L. Setting the injector system to produce a 1:100 dilution of 0.5% sodium thiosulfate stock solution will result in a final concentration of 50 mg/L
- Treatment plant evaluation. The raw water sampling should be initiated before the finished water sampling. The amount of time elapsed between the beginning of raw sampling and the beginning of finished sampling should be equivalent to the detention time of the system.
Sampling Procedure
- For pressurized water sources, connect the field filtration unit (Fig. 1), without the cartridge filter, to the water source. Flush the unit for 3 – 5 minutes with the source water to be sampled. If collecting samples from multiple locations, run a minimum of 50 gallons of sample water through the sampling equipment between samples to avoid cross contamination. Adjust the flow rate to 1 gpm (3.8 lpm) using flow control valve. Adjust pressure gauge to 10 psi using pressure regulator. Adjust both flow control valve and pressure gauge so that 1gpm flow rate and 10psi pressure are maintained. The water meter functions as both a totalizer and flow rate meter.
- Selecting the unit of measure (UOM)
Press and hold both the CAL and RESET buttons, until the UOM indicator blinks (approx. 3 seconds.) Once this happens, release both buttons. The UOM will continue to blink, indicating that you are in UOM selection mode. Press the RESET button to cycle through the different units available:
Gal = US gallons
Qts = quarts (1/4 gallon) Pts = pints (1/8 gallon)
L = liters
Once the desired UOM indicator is blinking, press and hold the CAL button to exit the UOM selection mode. - Operation
Batch Total: The meter will measure and display the batch volume with the large digit register on top. The units of measure are displayed to the right as Qts, Pts, L, or Gal. To reset the batch total simply press the RESET button momentarily.
Flow Rate and Totalizer Volume: The small digit register across the bottom of the display shows either the total volume (totalizer) or the current flow rate. This is indicated by the words “FLOW RATE” above the small digits, or “RESET TOTAL” to the right of them. To toggle back and forth between the 2, simply press the CAL button momentarily. To reset the totalizer, press and hold the RESET button until all 0’s show (approx. 3 seconds). The totalizer will be reset regardless of whether the meter is displaying the totalizer or flow rate.
- Selecting the unit of measure (UOM)
- For non-pressurized water sources, add a pump between filter and water meter. Be sure to put the sample intake in a location where the least amount of bottom sediment will enter into the sampling filter giving a distorted view of the sample. Adjust flow rate and pressure gauge as in Section 3.1. Note: Collect sample as near to intake site as possible.
- Insert filter into the housing and hand tighten housing. Make sure provided clamps are in place and tight at both inlet and outlet of the housing. Do not touch the filter with bare hands, use sanitary gloves or the plastic cover the filter is wrapped in. Turn water on slowly with the unit in an upright position. Invert unit to make sure all the air within the housing is expelled. Record the date, time of day, and gallon reading from the water meter before sampling.
- When the filter housing is full of water, return unit to upright position, maintain the flow rate at 1 gpm (3.8 lpm) and pressure at 10 psi throughout the sampling period.
- The sampling unit should be allowed to run for an 8-24 hour period according to the sampling parameters in Section 2.0.
- After filtering sample turn off the faucet or pump and disconnect the hose from incoming water source. Maintain the inlet hose level above level of opening on outlet hose to prevent backwashing and loss of particulate matter from the filter. Pour residual water from filter housing into a Ziploc bag.
- Remove the sampling cartridge with the plastic cover or sanitary latex gloves. Do not touch with bare hands. Place filter in a second heavy duty quality ziploc (whirlpac) bag and seal.
- Record stop time and final meter reading. Subtract the initial reading from the final reading and record the total volume collected. Document the name and location of each sample point, sampling site (raw or finished) and type of treatment.
- With permanent marker record the sample identification, gallons sampled, collection dates and times, collector’s name and water quality parameters directly on the bag or on a waterproof label. Double pack the bags containing filter and residual water with ziploc bags. Make sure all bags are sealed to prevent leakage.
- If immediate shipping is not possible, the sample should be stored in a 1-5°C refrigerator, until shipping.
- Place freezer cold packs in the shipping container. Place insulating material between the filter and cold packs to prevent sample freezing. Samples that arrive at the laboratory frozen will be rejected. Place data sheet containing recorded information in a sealed plastic bag and ship with the filters.
- Ship all samples and sampling kits via OVERNIGHT delivery to the address below:
Attn: Aquatic Microbiology EMSL Analytical, Inc.
200 Route 130 North
Cinnaminson, NJ 08077
Phone: 800-220-3675
Fax: 856-786-0262
Email: info@emsl.com


 English
 French
 Spanish
 Portuguese